Hello,
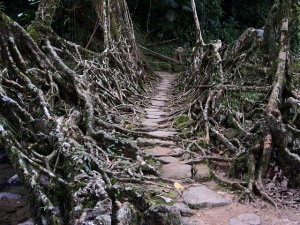
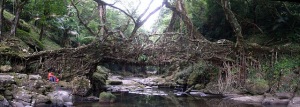
My name is Jeff and I’m going to attempt to take you through the process of my latest project. A mild re-cap is in order to explain the project. About 6-9 years ago, Beez, Danny, and I began a Warmachine board which would generically be called the Warmachine Snow Board. Why just “snow” board when the table had other elements such as a river and tree’s? I don’t know, so anyways we completed the board and there was much rejoicing! Flash forward some odd years and the board was in poor shape. It’s neglect and disrepair stem from many elements, well I guess only two. Number one, using baking soda, ( Danny), for snow. We had a very long rain storm in Hawaii, around 40 days, biblical actually. The baking soda “snow” apparently sucks moisture out of the air even through what ever sealant we used, and well you can imagine the rest. Two, the table was stored at a home, (Kyle), where some individuals were not aware of the fragility that such tables possess. So, when I was asked if I wanted it back to “restore”, I wasn’t quite prepared.


The general idea was to refurbish the board quickly because I have 400 or so other projects I want to do. This idea failed. I decided I wanted to add a few structures to add some tactical diversity. Oh well, so much for “quick”. I decided to add two building structures and maybe some structure accents. I would base the building ideas on a Khador manor/vacation house. I really wanted to build a log cabin. IDK. The pic’s above are the table as is when I picked it up. I had to immediately vacuum because the baking powder was detaching itself rapidly. This was probably a good thing, if I had put it away, I probably would have never started it. You can also see where the foliage clumps seemed to have rusted? This is my first blog so please forgive any mistakes, bad pic’s, grammar and etc. etc.
This first phase I will call “cleanup”, cause that’s what I’m doing. The bridges got the same work over, just a little gentler. Next was to pry the trees apart and collect the clumps of foliage that were falling off. Later I just picked nearly all the clumps off because they were so loose anyways. I also wanted to re-bend the tree’s, they got a little compressed.


")

Phase II. Repair Work. Next I had to repair some dings and dents, and chunks missing from my board. (Kyle :o) I bought a product called Foam Coat, from Hotwire Foam Factory. They have a few, the one I used is a very hard coating, can’t even sand the stuff once hardened. The other is a rubber coating which I did not try on this board. I then painted all the repaired areas black. Once dry, I sprayed the border of the entire board with a Dark Green Krylon Camo to achieve a consistent look. I used a stiff piece of cardboard as a template. I wasn’t really to careful with this unless I was near the water effects. Just spray away from the direction you want to miss and it kinda works itself out. Work in a Well Ventilated Area,………….that’s right, I said it. Ode to Family Guy. Anyways. Last work for repair type stuff was to paint all areas of scraped off snow pure white so all the areas of snow looked consistent. Apparently we had some confusion as to what type of snow to use when we first built it. There were at least 3 different types. One was hard as rock but maintained it’s whiteness pretty well. Next stage is some planning. Much more fun.


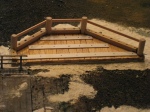
So, planning began with some paper cutouts. I usually do this on big projects, really helps with the placement and such. After that, I start cutting the foam core. Basically for this board, I wanted all pieces to be able to be pulled off for storage. Unfortunately, I have a peeve about just popping a building on a table unless it’s your regular gaming table, then Ok. So to rectify that, I build a foundation that the building can pop into, thereby looking like it’s actually a permanent part of the table. Using my paper template I cut the foam core to the dimensions I want. I used a foam brick wall that I had got from a x-mas store and cut strips to make my foundation walls.


Now, I start on the building. The foundation of above will be “planted” into the board to look like a real foundation. The building construction is foam core walls. I would suggest keeping your roof front and back attached to your front and back wall. I separated them for no apparent good reason.For the roof, just cut a single piece that covers the entire roof and score the plastic where you need it to bend. Just enough to bend, if it breaks, it will be a pain to place. I don’t worry about seems on this because I will have wood covering everything. I also attach some support foam core inside the building to help with resilience. Not pretty, but you won’t see it on the table.


Next step, start lining the windows and placing doors. Balsa wood was used for all these steps. The chimney was cut from insulation foam. I found a tip online about using guide strips from foam core. Sorry I don’t remember the author of that site, I unfortunately can not give him his do credit. Once the chimney was cut, I used a Hot Foam Cutter/scriber to make a stone pattern on the chimney. Don’t worry too much about cutting your balsa strips even. Randomness looks more natural.


Wood log and paneling placement begins. I started placing the logs first. Work from the bottom up. I used balsa logs in what I thought was an appropriate scale. Dowels would work well to. The little cutter is handy for exact cuts. I found the Craftsman Handi-Cut to be my tool of choice. Awesome cutter, easy and mostly accurate. I made sure I placed my bottom logs while the house was sitting in the foundation so I would have a good seam when the building was placed. About half way through I noticed I didn’t like the exact roundness of the end of the logs. So I began to sand the end of each one to look more natural. Also went back and sanded the edges of the ones I had placed. There was no real plan to placement. Initially the whole house was going to be logs, then I began to think that might be rather boring. So I googled “log cabins” and found some inspiration for variety.


Before moving on the the planking. I decided to place my foundation into the board. Basically, any portion of the board that was preventing my foundation from lying flat was cut away. Then I cut away an outline of the whole foundation so it would set slightly depressed even in the shallow areas. I then applied a spackle glue mix, placed the foundation and placed weights to keep it down firm. That was a mistake. I should have just let it set, placing weights on each portion gave a slight initially undetected torque to the foundation that would cause me grief later. Lesson learned.


Now on to the plank placement and plasticard accents. Planks can go vertical, horizontal, or slanted. Try to keep a small gap between, helps with the final look by adding some depth, texture and shading to your building. I glued all my plasticard with wood glue. Gave me extra time to position. Stays pretty durable to.


Finished up the plasticard trim and and began placing rivets on surfaces. I used a whole punch method because it’s quick and easy and I had lots of rivets to place. I used wood glue for application, this gives me a little working time to maneuver pieces if I have to. I pre-measured rivet placement by making pencil marks where I wanted them to go. I used a sharp x-acto blade to lightly poke the rivet and place on the pre-set marks. Once you get the rhythm, it’s pretty quick. I finished all placement in about half an hour. Punching holes and measuring maybe another half hour. I was worried about adhesion with the wood glue, but in the later painting stages they held really well.


So, I decided I was going to make a deck for the Manor House. This was a wee bit tricky, once again I used the trusty paper template to get my shape. Thing’s went fairly smoothly, I used a couple of pieces of larger Balsa to get the general shape, then laid planking on those pieces to make it look like a deck. I wanted the posts to be sturdy, so I dug into the foam and planted some round plasticard. Then I glued the wooden Balsa Posts into the Plastic. Things were going so well. My wife came home from work after it had dried an said “nice deck, why is it leaning forward.” I said “it’s not leaning forward”, just about the same time I realized it was leaning forward. Not happy about that one. I decided I would glue horizontal wood between the vertical supports, wedge some anchors which propped the deck into a more desirable position, and let dry. Actually worked pretty well and only wasted about an hour. 😦 I then decided I would magnetize the deck railing so storage would remain feasible. I used flat nail heads, which I snipped, and REM of similar diameter. Worked good until I flocked/snowed stuff. Now it doesn’t sit as cleanly, and I can’t figure out why. Everything looks like it should be flush. Whatever. I also pre spray primed the underneath of the deck and posts so it would already be black and save me hassle after construction.


Next up, make what I call a structure accent. Why call it that, IDK. Anyways, decided on a small dock. I initially was going to have a water-mill thing going on, but that’s something that would have had to be in the initial designing stages. Adding it after would have made a mess. I cut away some more of my board so the planks could lay imbedded. Added a few stairs going off the side, and a small dock. Stairs were challenging, wanted to make them usable. Had to be spaced wide enough, and the steps themselves had to support a std Warmachine mini. Once again, I pre-primed areas that would be difficult to reach once placed.


Next up was the lookout construction. Added this in just to give some symmetry to the overall structural placement. After all was said and done, I ended up not liking the placement because it was to close to the bridge. Oh well, to late now. Same general construction, plasticard, Balsa wood planks. It was designed in the general shape of the cliff face. I ended up making 3 pins to plug this into the foundation, kept it from moving.


The next and last structure was the Galleria?. IDK what it’s called. Anyways, once again, made a foundation that was flat regardless of actual table levelness. I used a commercial brand brick pattern plastic sheet for the foundation walls this time. I would not recommend this unless you have backing behind the card, it’s very thin. Since I was using a plug-in system, the card had no support. This will probably end up being a problem later. I cut the basic shape, cut into the board with that shape, plastic and balsa with a design towards a removable roof. To reinforce the thin plastic brick card stock, I elevated the ground around the foundation with the Hot Wire Foam Factory Foam Coat. This added quite a bit of strength and left only a small portion of the thin material exposed.


The roof for the Galleria was challenging. I had to figure out how to make a slant that would still cover the bottom floor. This is probably very easy for those with math skills or perhaps some engineering knowledge, a theorem perhaps? For me, I just guessed a little bit. I wanted a drop in the roof of .5 inches, so I measured .5 inches wider on the perimeter of the roof that the perimeter of the base. Then, when I slanted my roof by .5 inches, it should match up to the perimeter of the base. That actually worked. Not sure if that would always work, but in this case it was successful. Is used thick plastic card which gives the roof a sturdy look. It also makes it more difficult to cut. You can see all my pencil measurements in the pic’s. I used a scriber to make my cuts, and just bent when it was deep enough. All the railing’s were built the same way so I could keep the general appearance throughout the structures the same. I uses the same dowels, pre-cut Balsa Wood, which kept a uniform look to the railings, and plastic card as a foundation. The railing’s in front of the Manor House were magnetized so they could be removed for storage. I am not a magnet placing aficionado, but Kenneth Taba showed me a way to place magnets with a flat head screw as the other surface. This does make things much easier. You do not have to worry about polarity in this case. I couldn’t find flat head screws that were small enough, so I used flat head nails and snipped off the unneeded part.


Let the painting begin! I started by priming with Rustoleum Camo Black, then gave a slightly lighter coat of Rustoleum Dark Camo Brown. Great colors, very flat. I originally was going to use my craft paints for my dry brushing. After a few attempts, I remembered an article I’d read on Craft Paint comparison and pigment strength. This article explained why craft paints are good for very textured terrain, but quality is not close to miniature paints. As I was dry brushing, I noticed a lot of streaking, no matter how dry my brush was. For most my tables, I had used these paints before to good effect. My conclusion was the balsa wood did not provide a good texture for a weak pigment paint. I tried a Geo Hex brand next and that worked pretty well. I think 3 colors was my limit for these, maybe a final whitish highlight. I used craft paints for the chimney, it had good texture, worked well. I also wanted mt foundations to be grey, so I taped all the perimeters, took the tables outside and Sprayed Flat Primer Grey, this way there are no brush strokes. I know you won’t see them during play, but I have issues. 🙂


I used 3 brown tones to paint the house. I also was painting over a dark brown base coat, so if you started from black, you would have to start with a dark brown. I added in some red washes, ( GW Red Wash), on the larger wood panels to add some variation. Any areas that didn’t look right because of streaking or whatever could be covered with snow after. I used dry brushing for the logs and I painted all the flat boards with a lighter base coat, Vallejo Med. Flesh. I then washed all the flat boards that weren’t going to be red with a GW Devlan Mud wash , then dry brushed on top of that.


The lookout was painted the same way for the wood planking. I then painted Vallejo Intermediate Green on the “metal” parts. To add a rust effect, I sponged a mixture of Vallejo Med. Flesh with MIG Light and Regular Rust Pigments mixed in. This was my first sponge attempt. I tore a small piece of sponge off, put it into a pair of tweezers that I didn’t have to hold closed, and lightly sponged on my rust. It worked pretty well, so well actually that I totally over did the rust effect. Because I was adding snow coverage it turned out alright, but without the snow I would have had to eliminate some of the rust to balance everything out. Less really is more. The window coverings were cut out of Granny Grating. Just cut to shape. I bought Black Grating. I primed/Based with Rustoleum Khaki Camo, then sprayed a white final coat. I then chipped away a little of the paint so it would look a little worn.


For the larger roof areas on my two buildings, I had to find a way for larger rust application, sponging would have been lame. I checked online and found the “salting technique” which has been used by Scale Modellers for some time. I was always to chicken to try it on my vehicles. Terrain is a good time to practice stuff, because you can almost always save your piece somehow. Terrain making is a very forgiving aspect of this hobby. So I decided to test the underneath of the Galleria roof with the technique, that way if it sucked I could ignore it. I used two types of salt. Table salt and a larger grained salt. This would hopefully give me a lack of uniformity. I applied salt with water and a brush. Takes a little getting used to, but the technique is pretty user-friendly. After the test, I was very pleased with the results and continued with the rest of the buildings. I taped off the roof and sprayed with a green that matched my Vallejo green pretty well. I then sprayed a light green in areas to give a faded look. After the piece dries, scrape off the salt with your fingers or a brush. Some falls off easily, other areas stick pretty well. Unexpectedly, this technique leaves a raised residue in some places which really adds to the rust effect. If you don’t like that part, you could always use water to rinse the salt away. Just make sure you dull coat your piece before salt application if your thinking of using water. The railings were painted the same way as the outlook area. After the salts off, I came in with a sponge to add rust color to the brown areas. There is a good Rust Primer color, which would have been a smarter move.


Flock time. I decided to re-flock the areas because it was looking a little thin. I used 3 tones and replicated a scatter technique I saw online where you just take little pinches of colors and put them all over and around each other. Sorry I can’t give credit to the creator of that idea, don’t remember where I saw it. This technique provides a nice randomness, avoiding the golf course look. I initially had forest scatter to apply to the areas that would have trees. I cancelled that idea however, to difficult to adhere the larger chunks at such a late stage in development. As for the snow, Amory suggested mixing snow flock with white glue and water and applying as a paste. This technique works well for an illusion of volume. I did have some issues with smoothness, but the overall effect works well and since this is a melting snow area, it kinda works. More practice is needed to perfect this technique though. I also noticed after the first snow application that some areas were turning brown.?? I believe there was some rust left over from the clumps of foliage we had applied on the first build. I ended up leaving the spots because it looked kinda natural, melting snow will show dirt underneath. Plus it’s easier just to let it go.:) This was the point in the project where I just needed to finish soon or it may have went into perpetual storage. The buildings were also given the snow job, and I used a few layers so the snow would look like it was hanging a little over edges. I also dull coated the buildings first, I wasn’t sure if the MIG rust pigment would stain my snow? I used this stage to also repair a few of my tree plugs. For the trees on this board, I plugged hollow plastic rod into the board and put pins into the tree trunks. Eh! Not very durable over time. Many of the plugs got depressed further over time. I made a foam coat mix, cut some new pieces of plastic rod and reinforced about a dozen wholes. I probably wouldn’t use this plug method again, not sturdy enough.


Trees. “sigh”. I pretty much dreaded this portion of the project and I put it off as long as I could. Had to be done though. I decided to make some tree stands first. The last time the trees were stored, they were placed on top of each other in a box. I don’t think this is healthy for trees to be stored like that. I had some 2×4 wood cut into lengths that would fit a pre-selected box. I then drilled staggered wholes into the wood to hold my tree’s upright. To apply all the clumps that had fallen off, I used craft tacky glue. After all the clumps were placed, I sprayed a watered down mixture of PVA glue to help seal everything. Pretty muck soaked them. After drying, I had to create some Zenithal Snow appearance. Because I was reapplying clumps that had already had snow flock applied, I had snow upside down snow on the trees. No good. Trying to apply all the clumps with snow facing up was taking to long, so I fudged it. I ended up holding all the trees upside down and spraying a Dark Camo Green from underneath. I then turned them all over and sprayed a white from the top. Worked pretty well for a melting snow board. Trees look like they have a light snow dust.


The Devils in the Details. Amory decided to help me with some iconography with his new Toy of Infinite Goodness. I would have had to cut something much less cool from hand if he hadn’t lent me his wisdom. I painted these up with some chipping and sponge techniques to keep them consistent with the weathered feel. I ended up having to black line around the edges after placement to help them stand out more. Thanks Wife. Although I dreaded having to do it, I dreaded having to tell her she was right even more. 😦 I also added some clump grass to the board in different colors. After watching a video on TerranScapes, this guy is very good, I used a technique he used to apply some taller grass/weed thingy’s. I drilled little wholes were I wanted to plant my weed/grass thingy. I tried placing grass clumps over areas of brown snow to give the appearance of ground cover coming through the snow. It kinda of accented placement for the bushes.


The final project. I’d like to thank my sponsors,………never mind, I don’t have any of those. I would like to thank my wife Heidi for not complaining about the dining table being occupied for a few months. Amory for the Blog inspiration and setting it up for us. I think the idea of chronicling my work was inspiring enough to actually start doing something. I was able to practice a few new techniques and all in all was happy with the final project as a whole. There are a few areas I would like to change, but it’s time for a new project. Following are pic’s of the final project with names on the bridge foundations of those who were involved. Beez, Danny, Amory and I. Thank you to anyone that has perused through this lengthy process with me.
Jeff


 The first prototype models just had some of the detailing so see how shallow they could be, while still looking good. Deeper details led to less stackability, so no undercut or recess was more than 1/16″ deep. The ladders on the sides turned out to interfere with stacking the most. After stress testing the models with one (stable, but easily breakable), two (difficult to break), and three (extremely difficult to break) layer thick sides for the hollow walls, I settled on 2-layers which gave optimal strength and stackability.


")